Identify and tag SSD Devices

You can use PSA SATP claim rules to tag SSD devices that are not detected automatically.
Only devices that are consumed by the PSA Native Multipathing (NMP) plugin can be tagged.
Procedure
First find all your relevant information
- Identify the drive to be tagged and its SATP.
- For example our drive is called (naa.600605b008f362e01c91d3154a908da1):1
- Type esxcli storage nmp device list -d naa.600605b008f362e01c91d3154a908da1
- The command results in the following information.
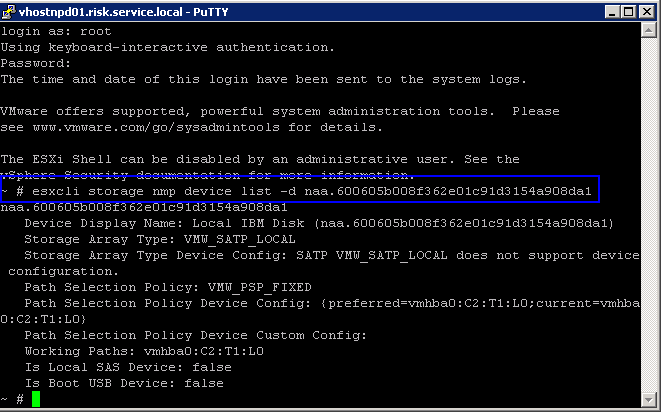
- Note down the SATP associated with the device.
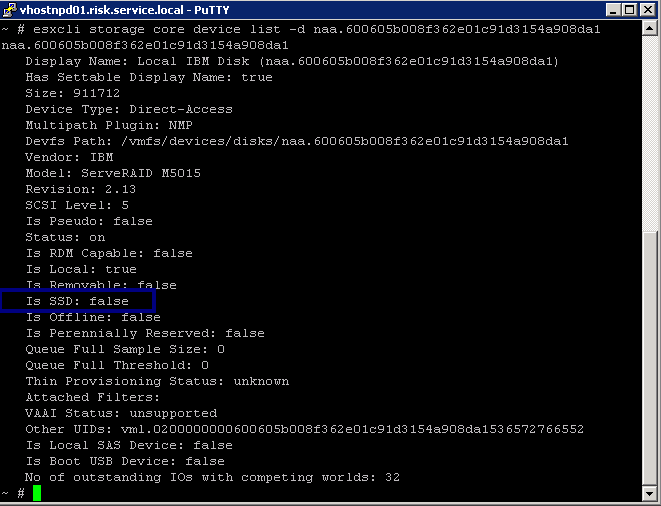
- You can also run the following to get extra information and you can see that Is SSD is marked false when it should be true
- esxcli storage core device list -d naa.600605b008f362e01c91d3154a908da1
Create a new SATP Rule
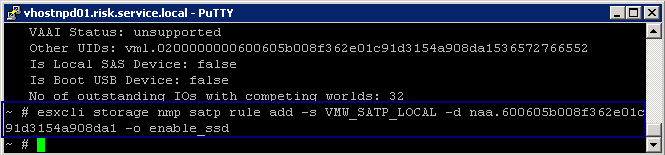
- Add a PSA claim rule to mark the device as SSD.
- There are several ways to do this
- You can add a claim rule by specifying the device name.
- esxcli storage nmp satp rule add -s VMW_SATP_CX -d naa.600605b008f362e01c91d3154a908da1 -o enable_ssd
- You can add a claim rule by specifying the vendor name and the model name.
esxcli storage nmp satp rule add -s VMW_SATP_CX -V vendor_name -M model_name –option=enable_ssd - You can add a claim rule based on the transport protocol.
- esxcli storage nmp satp rule add -s VMW_SATP_CX –transport transport_protocol –option=enable_ssd
- You can add a claim rule based on the driver name.
- esxcli storage nmp satp rule add -s VMW_SATP_CX –driver driver_name –option=enable_ssd
Restart the host
- You now need to restart the host
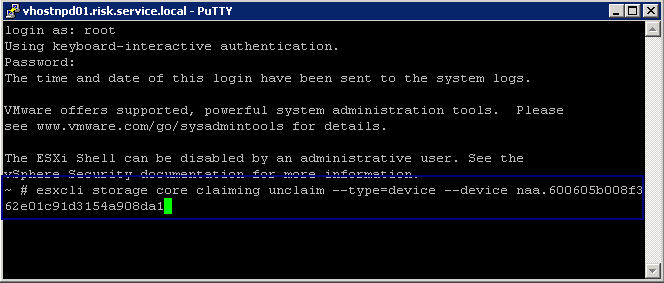
Unclaiming the device
- You can now unclaim the device by specifying the device name.
- esxcli storage core claiming unclaim –type device –device naa.600605b008f362e01c91d3154a908da1
- You can unclaim the device by specifying the vendor name and the model name.
- esxcli storage core claiming unclaim –type device -V vendor_name -M model_name
- You can unclaim the device based on the transport protocol.
- esxcli storage core claiming unclaim –type device –transport transport_protocol
- You can unclaim the device based on the driver name.
- esxcli storage core claiming unclaim –type device –driver driver_name
Reclaim the device by running the following commands.
- esxcli storage core claimrule load
- esxcli storage core claimrule run
- esxcli storage core claiming reclaim -d naa.600605b008f362e01c91d3154a908da1
Verify if devices are tagged as SSD.
- esxcli storage core device list -d device_name
- or
- esxcli storage core device list -d naa.600605b008f362e01c91d3154a908da1 |grep SSD
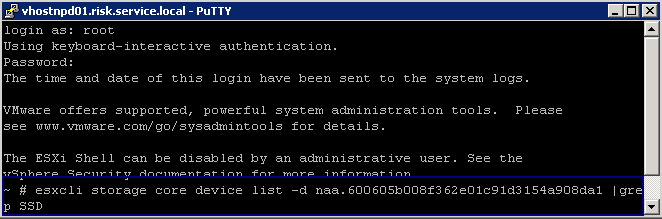
The command output indicates if a listed device is tagged as SSD.
- Is SSD: true
What to do next
If the SSD device that you want to tag is shared among multiple hosts, make sure that you tag the device from all the hosts that share the device.