Monday 30 November 2015

vCenter Server advanced settings for vSphere 5.5

vCenter Server 5.5

Setting Description
ads.checkInterval User validation interval
ads.checkIntervalEnabled Enable user validation
ads.maxFetch Maximum users to retrieve
ads.maxFetchEnabled Enable user retrieve limits
ads.timeout User retrieve timeout
AgentUpgrade.autoUpgradeAgents vCenter Agent Upgrade
AgentUpgrade.checkPeriodSeconds Host upgrade check frequency
alarms.upgraded Default alarms have been created
alarms.version Default alarm upgrade version
client.timeout.long Long operation client timeout
client.timeout.normal Client timeout
DBProc.Log.Buffer DB procedures log buffer
DBProc.Log.Level.Stats.Purge1 Log level for daily stats purge
DBProc.Log.Level.Stats.Purge2 Log level for weekly stats purge
DBProc.Log.Level.Stats.Purge3 Log level for monthly and yearly stats purge
DBProc.Log.Level.Stats.Rollup1 Log level for daily stats rollup
DBProc.Log.Level.Stats.Rollup2 Log level for weekly stats rollup
DBProc.Log.Level.Stats.Rollup3 Log level for monthly stats rollup
DBProc.Log.Level.Topn.Calc1 Log level for topn rank of daily stats
DBProc.Log.Level.Topn.Calc2 Log level for topn rank of weekly stats
DBProc.Log.Level.Topn.Calc3 Log level for topn rank of monthly stats
DBProc.Log.Level.Topn.Calc4 Log level for topn rank of yearly stats
DBProc.Log.Level.Topn.Purge1 Log level for purge of daily topns
DBProc.Log.Level.Topn.Purge2 Log level for purge of weekly topns
DBProc.Log.Level.Topn.Purge3 Log level for purge of monthly topns
DBProc.Log.Level.Topn.Purge4 Log level for purge of yearly topns
event.maxAge Maximum event age
event.maxAgeEnabled Enable event cleanup
instance.id Instance ID
LicenseServer.matchHostToVirtualCenter Match host license server to vCenter
log.level Logging level
mail.sender Mail sender
mail.smtp.port SMTP server port
mail.smtp.server SMTP server
Perf.Stats.MaxCollectionThreads Maximum statistics collection threads
snmp.receiver.1.community First SNMP receiver community
snmp.receiver.1.enabled Enable first SNMP receiver
snmp.receiver.1.name First SNMP receiver name
snmp.receiver.1.port First SNMP receiver port
snmp.receiver.2.community Second SNMP receiver community
snmp.receiver.2.enabled Enable second SNMP receiver
snmp.receiver.2.name Second SNMP receiver name
snmp.receiver.2.port Second SNMP receiver port
snmp.receiver.3.community Third SNMP receiver community
snmp.receiver.3.enabled Enable third SNMP receiver
snmp.receiver.3.name Third SNMP receiver name
snmp.receiver.3.port Third SNMP receiver port
snmp.receiver.4.community Fourth SNMP receiver community
snmp.receiver.4.enabled Enable fourth SNMP receiver
snmp.receiver.4.name Fourth SNMP receiver name
snmp.receiver.4.port Fourth SNMP receiver port
SSL.Version SSL version
task.maxAge Maximum task age
task.maxAgeEnabled Enable event cleanup
TOPN_LOGING_MODE TopN calculations log level
TOPN_LOG_BUFFER TopN calculations max log rows
TOPN_STATS_DELAY_MINS_1 TopN calculations daily delay
TOPN_STATS_DELAY_MINS_2 TopN calculations weekly delay
TOPN_STATS_DELAY_MINS_3 TopN calculations monthly delay
TOPN_STATS_DELAY_MINS_4 TopN calculations yearly delay
VirtualCenter.CacheSize Cache size
VirtualCenter.DataCollector.Enabled Enable customer experience improvement program data collection
VirtualCenter.DataCollector.Schedule Customer experience improvement program data collection schedule
VirtualCenter.DBPassword Database password
VirtualCenter.FQDN vCenter FQDN
VirtualCenter.InstanceName Instance name
VirtualCenter.LDAPAdminPrincipal LDAP administrator principal
VirtualCenter.ManagedIP vCenter management IP address
VirtualCenter.MaxDBConnection Maximum database connections
VirtualCenter.VimApiUrl VIM API URL
VirtualCenter.VimPasswordExpirationInDays Password expiration
VirtualCenter.VimWebServicesUrl Web services URL
vpxd.httpClientIdleTimeout Http Client Pool Idle Timeout
vpxd.license.ForceDownloadDLF Force Download DLF
vpxd.locale Server locale
vpxd.npivWwnGeneration.portWwnNumber Generation port WWN number
vpxd.npivWwnGeneration.singleNodeWwn Generation single node WWN
vpxd.usageStats.duration Usage statistics duration
vpxd.usageStats.level Usage statistics level
vpxd.usageStats.persist Save usage statistics to the database
vpxd.vod.persist Save usage statistics to a file
WebService.Ports.http HTTP port number
WebService.Ports.https HTTPS port number
wwn.instance.id WWN instance

What is EFI (or UEFI) firmware?

EFI (Extensible Firmware Interface) is a specification for a new generation of system firmware. An implementation of EFI, stored in ROM or Flash RAM, provides the first instructions used by the CPU to initialize hardware and pass control to an operating system or boot loader. It is intended as an extensible successor to the PC BIOS, which has been extended and enhanced in a relatively unstructured way since its introduction. The EFI specification is portable, and implementations may be capable of running on platforms other than PCs.

Originally called Extensible Firmware Interface (EFI), the more recent specification is known as Unified Extensible Firmware Interface (UEFI), and the two names are used interchangeably.  (I tend to use the name "EFI" for anything that was produced or defined before the name change, and "UEFI" for anything since the name change.)

How do I start using EFI firmware?

You must make this choice before installing the OS.

On VMware Workstation, go into VM > Settings > Options > Advanced, and check Boot with EFI instead of BIOS.
WS enabling EFI.png

Thanks for picture VMware.com

On VMware Fusion, EFI firmware is automatically selected for Mac OS guests.  You do not need to do anything.

On ESXi using the vSphere Web Client, go into Edit Settings > VM Options > Boot Options, and choose under the Firmware section.
vSphere Web Client enabling EFI.png

On ESXi using the vSphere Client, go into Edit Settings > Options > Boot Options, and choose under the Firmware section.
vSphere enabling EFI.png

On any of our products with EFI support, you can also manually edit the virtual machine's configuration file to add the line

   firmware = "efi"

to configure a virtual machine for EFI.  The above user-interfaces do exactly that for you.  You can use this method if you want to play around with EFI in configurations that we don't officially support (such as Linux on EFI in Fusion 7), but of course things might very well break.

Administer Hardware Acceleration for VAAI


VAAI stands for vStorage APIs for Array Integration. It provides Hardware Acceleration functionality, enabling your ESXi hosts to offload certain virtual machines and storage operations to the storage array. When VAAI is in use, ESXi hosts are able to perform these operations faster and with less impact to the host itself. VAAI requires:
  • Enterprise or Enterprise Plus licence
  • Storage Array that supports VAAI storage-based hardware acceleration. You can determine whether your array supports VAAI by checking the VMware HCL.
The Hardware Acceleration available for block devices are:
  • ATS (Atomic Test & Set) – Used during locking and creation of files
  • Clone Blocks/Full Copy – Used to copy or migrate data within the same array
  • Zero Blocks – Used to zero out disk regions
  • Thin Provisioning – Allows the array to reclaim space on thin provisioned LUNs.
  • Block Delete – Allows for space to be reclaimed using the SCSI UNMAP feature.
VAAI is controlled by these advanced settings:
  • HardwareAcceleratedLocking (ATS)
  • HardwareAcceleratedMove (Full Copy)
  • HardwareAcceleratedInit (Zero Blocks)
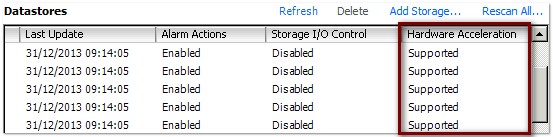
Using the vSphere client, you can easily see whether Hardware Acceleration is supported for your storage device. To do so, select a host that has access to the storage device, then browse to Configuration | Storage:

vaai_hardware_acceleration
You can also check whether it is supported using esxcli:

~ # esxcli storage core device vaai status get
naa.60a980900646e3Cfa3346f3450576f59
   VAAI Plugin Name: VMW_VAAIP_NETAPP
   ATS Status: supported
   Clone Status: supported
   Zero Status: supported
   Delete Status: supported
 
You can check to see whether VAAI is enabled by browsing to Configuration |Software |Advanced Settings, and checking the following features are enabled:
  • DataMover.HardwareAcceleratedMove
  • DataMover.HardwareAcceleratedInit
  • VMFS3.HardwareAcceleratedLocking
If they are enabled, the value will be set to ’1′, which is the default:

vaai_enabled 

You can also check if VAAI is enabled by using the CLI. You can either use esx/vicfg-advcfg to check the advanced settings:

# esxcfg-advcfg -g /DataMover/HardwareAcceleratedMove
# esxcfg-advcfg -g /DataMover/HardwareAcceleratedInit
# esxcfg-advcfg -g /VMFS3/HardwareAcceleratedLocking
 
Or you can use esxcli:

# esxcli system settings advanced list -o /DataMover/HardwareAcceleratedMove
# esxcli system settings advanced list -o /DataMover/HardwareAcceleratedInit
# esxcli system settings advanced list -o /VMFS3/HardwareAcceleratedLocking

For example:

~ # esxcli system settings advanced list -o /DataMover/HardwareAcceleratedMove
   Path: /DataMover/HardwareAcceleratedMove
   Type: integer
   Int Value: 1
   Default Int Value: 1
   Min Value: 0
   Max Value: 1
   String Value:
   Default String Value:
   Valid Characters:
   Description: Enable hardware accelerated VMFS data movement (requires compliant hardware)

T10 based SCSI Commands

If your storage device is T10 compliant then it will use the T10 based SCSI commands, which allows hardware acceleration without the use of a VAAI plugin. If you storage device isn’t T10 compliant then VAAI is used to enable hardware acceleration.

VAAI Plugins and Filters

In order to communicate with devices that do not support the T10 SCSI standard a VAAI filter and a vendor-specific VAAI plugin is used. To view the VAAI plugins you can run:

~ # esxcli storage core plugin list -N VAAI
Plugin name       Plugin class
----------------  ------------
VMW_VAAIP_NETAPP  VAAI
 
And to display the filters you can run:

~ # esxcli storage core plugin list -N Filter
Plugin name  Plugin class
-----------  ------------
VAAI_FILTER  Filter
 
You can view the Hardware Acceleration support status of a device by running:

~ # esxcli storage core device list -d naa.xxxxxxxxxxxxxxxxxxxxxxxxxxx
   Display Name: NETAPP Fibre Channel Disk 
   Has Settable Display Name: true
   Size: 1024111
   Device Type: Direct-Access
   Multipath Plugin: NMP
   Vendor: NETAPP
   Model: LUN
   Attached Filters: VAAI_FILTER
   VAAI Status: supported

VAAI Claimrules

Every block storage device that is managed by VAAI needs two storage claim rules. It needs one that specifies the hardware acceleration filter and it needs one that specifies the hardware acceleration plugin for the device.
To list the filter claim rules:

~ # esxcli storage core claimrule list -c Filter
Rule Class   Rule  Class    Type    Plugin       Matches
----------  -----  -------  ------  -----------  ----------------------------
Filter      65429  runtime  vendor  VAAI_FILTER  vendor=MSFT model=Virtual HD
Filter      65429  file     vendor  VAAI_FILTER  vendor=MSFT model=Virtual HD
Filter      65430  runtime  vendor  VAAI_FILTER  vendor=EMC model=SYMMETRIX
Filter      65430  file     vendor  VAAI_FILTER  vendor=EMC model=SYMMETRIX
Filter      65431  runtime  vendor  VAAI_FILTER  vendor=DGC model=*
Filter      65431  file     vendor  VAAI_FILTER  vendor=DGC model=*
Filter      65432  runtime  vendor  VAAI_FILTER  vendor=EQLOGIC model=*
Filter      65432  file     vendor  VAAI_FILTER  vendor=EQLOGIC model=*
Filter      65433  runtime  vendor  VAAI_FILTER  vendor=NETAPP model=*
Filter      65433  file     vendor  VAAI_FILTER  vendor=NETAPP model=*
Filter      65434  runtime  vendor  VAAI_FILTER  vendor=HITACHI model=*
Filter      65434  file     vendor  VAAI_FILTER  vendor=HITACHI model=*
Filter      65435  runtime  vendor  VAAI_FILTER  vendor=LEFTHAND model=*
Filter      65435  file     vendor  VAAI_FILTER  vendor=LEFTHAND model=*
 
And to list the plugin claim rules:

~ # esxcli storage core claimrule list -c VAAI
Rule Class   Rule  Class    Type    Plugin            Matches
----------  -----  -------  ------  ----------------  ----------------------------
VAAI        65429  runtime  vendor  VMW_VAAIP_MASK    vendor=MSFT model=Virtual HD
VAAI        65429  file     vendor  VMW_VAAIP_MASK    vendor=MSFT model=Virtual HD
VAAI        65430  runtime  vendor  VMW_VAAIP_SYMM    vendor=EMC model=SYMMETRIX
VAAI        65430  file     vendor  VMW_VAAIP_SYMM    vendor=EMC model=SYMMETRIX
VAAI        65431  runtime  vendor  VMW_VAAIP_CX      vendor=DGC model=*
VAAI        65431  file     vendor  VMW_VAAIP_CX      vendor=DGC model=*
VAAI        65432  runtime  vendor  VMW_VAAIP_EQL     vendor=EQLOGIC model=*
VAAI        65432  file     vendor  VMW_VAAIP_EQL     vendor=EQLOGIC model=*
VAAI        65433  runtime  vendor  VMW_VAAIP_NETAPP  vendor=NETAPP model=*
VAAI        65433  file     vendor  VMW_VAAIP_NETAPP  vendor=NETAPP model=*
VAAI        65434  runtime  vendor  VMW_VAAIP_HDS     vendor=HITACHI model=*
VAAI        65434  file     vendor  VMW_VAAIP_HDS     vendor=HITACHI model=*
VAAI        65435  runtime  vendor  VMW_VAAIP_LHN     vendor=LEFTHAND model=*
VAAI        65435  file     vendor  VMW_VAAIP_LHN     vendor=LEFTHAND model=*
 
To configure hardware acceleration for a new array you need to add filter and plugin claimrules. You then need to load the rules into runtime. To create the claimrules, for example:

~ # esxcli storage core claimrule add --claimrule-class=Filter --plugin=VAAI_FILTER --type=vendor --vendor=EMC --autoassign
~ # esxcli storage core claimrule add --claimrule-class=VAAI --plugin=VMW_VAAIP_SYMM --type=vendor --vendor=EMC --autoassign
 
Then to load the claim rules into the system:

~ # esxcli storage core claimrule load --claimrule-class=Filter
~ # esxcli storage core claimrule load --claimrule-class=VAAI
~ # esxcli storage core claimrule run --claimrule-class=Filter
 
If you wanted to prevent a particular storage array from using VAAI you can do so by using the VMW_VAAIP_MASK VAAI plugin rule. For example:

# esxcli storage core claimrule add -t vendor -P VMW_VAAIP_MASK -V EMC -c VAAI --autoassign

Wednesday 25 November 2015

Joining a Platform Service Controller to the AD Domain (vCSA 6.0)

In vCSA 6.0 the way we connect the AD is changed when compare to the older version. To join the AD in 6.0 VMware  included the Infrastructure node configuration which is part of the Platform Service controller.
When we have more that one PSC in the Load Balacer configuration then we have to configure the AD in all the PSC so that if active PSC is down still we can login to the other PSC.

Before configuring the AD make sure the Time Synchronization and naming is correct between the PSC and AD.

Login to the Web-Client with SSO Username and Password.
Navigate to Administration – Deployment – System Configuration.
l2ed 9itled
Select the Platform Service Controller and go to Manage –
Active Directory.
Click join
e45d9d

0ed
Once the authentication is provided then make sure to reboot the PSC and when booted we can see the AD configuration.
01ed
Make the same changes to the other PSC node also and in case if we are having issue on adding AD to the PSC and getting the below error then we need to activate the agent directly by login in to the PSC.
56ed
-ed
Login to the PSC SSH : /opt/likewise/bin/domainjoin-cli join domain username
Provide the AD password to join the domain.
Once it shows SUCCESS then reboot the PSC node.
Note it wont show the domain in GUI AD option like other PSC but still it is authenticated with the AD domain.
Another way to add the Domain is to by login to the Https://FQDNPSC/PSC
Provide the administrator@domain.local \ password
Go to the Appliance Settings.
Click Manage
Add Active Directory.
ssgo1
After the AD configuration is completed in PSC , Go to the Single Sign-On – Configuration – Identity Sources.
Click on Add symbol +
Ung
Before adding the AD Domain in PSC it will show the below message .
3led
Select the first option Active Directory ( Integrated Windows Authentication ) and in the Domain Name we can see the AD Domain which we added in the PSC.
Ungg
Next we have to add the appropriate AD Groups and the Users to the roles we want to access the VC.
Go to Global Permissions.
Und
Ungd
Click Add.
Select the AD Domain.
Search the User or Group
Un43
Also if you want to login directly with your domain user without adding the domainname in the username credentials , make the domain as default so it will allow directly AD user without domain name.
aad
Once user is added then try to login in to the webclient using the AD user.

Replacing vCenter 6.0 SSL Certificate.

To generate the certificate we need to have Microsoft Certificate Authority server with the vSphere 6.0 Template for SSL Certificate.Pls check my other blog on creating the new template for vSphere 6.0.
Generate the Certificate Signing Request
In vSphere 6.0 and later, the VMware Certificate Authority (VMCA) provisions your environment with certificates. This includes machine SSL certificates for secure connections, solution user certificates for authentication to vCenter Single Sign-On, and certificates for ESXi hosts that are added to vCenter Server.
In this blog we can see how to generate the Machine SSL Certificate .
Machine SSL Certificates
The machine SSL certificate for each node is used to create an SSL socket on the server side to which SSL clients connect. The certificate is used for server verification and for secure communication such as HTTPS or LDAPS.
All services communicate through the reverse proxy. For compatibility, services that were available in earlier versions of vSphere also use specific ports. For example, the vpxd service uses the MACHINE_SSL_CERT to expose its endpoint.
Every node (embedded deployment, management node, or Platform Services Controller), has its own machine SSL certificate. All services that are running on that node use this machine SSL certificate to expose their SSL endpoints.
The machine SSL certificate is used as follows:
By the reverse proxy service on each Platform Services Controller node. SSL connections to individual vCenter services always go to the reverse proxy. Traffic does not go to the services themselves.
By the vCenter service (vpxd) on management nodes and embedded nodes.
By the VMware Directory Service (vmdir) on infrastructure nodes and embedded nodes.
VMware products use standard X.509 version 3 (X.509v3) certificates to encrypt session information that is sent over SSL between components.
To generate the certificate we need Microsoft Certificate Authority server with the vSphere 6.0 Template for SSL Certificate.
First create the folder under root on both PSC and VC appliance – /root/cerssl .
Pls check the blog to transfer the file using the Winscp .

Generate the Certificate Signing Request

First we need to generate the CSR ( Certificate  Signing Request ) for the Machine SSL which we get when we open the vSphere Web Client in a web browser.
Run the below command to Generate the CSR in VCSA
 /usr/lib/vmware-vmca/bin/certificate-manager
 Run the utility and Select the Option 1
Provide the SSO Password
1itled
123d
23led
Once CSR is generated then exit by option 2.
etled
Now login to the VC and do the same steps , only extra step is it will ask to provide the PSC IP address .
1etled
Once PSC IP is provided then generate the CSR by using the option 1
2wed
Exit the Certificate Manager by option 2.
Next step is to move the Machine CSR to the local machine by using the Winscp.
Unt90ed
Next step is to login to the internal certificate issuing server.
On the browser type the https://localhost/certsrv/
Click on Request a Certificate.
cfed
Click advanced certificate request
21tled
Click the below option Submit a certificate by using the 64-encoded.
3ed
Open the CSR file which downloaded using Winscp and copy the clipboard.
Paste it on the below option Base-64-encoded certificate request.
11Untitled_censored (1)
 Next Select the Certificate Template which we created before vSphere 6.0.
11Untitled_censored (2)
Next select the Base 64 encoded.
Click Download Certificate.
0led
 Rename the file to the appropriate node name.
Next Download the Download Certificate chain.
CERT.P7b
Open the Certificate chain and if we have the subordinate CA then we need to select both CA and Subordinate CA
First right click the Primary CA – All Tasks – Export.
Un0led
Click Next
23itled
Click Base-64 encoded X.509 (.cer)
Unt23ed233led
save the file as rootca.cer
Once done next again open the same chain file and select the subordinate CA .and export the same and save it as subca.cer.
Note:If we have only one CA then no need to do these steps.
Rename the rootca.cer and subca.cer to text file.
Create the new file called root64.txt.
0oled
Open the rootca.txt , Copy the content and pate it in the root64.txt.
Now open the subb.txt , Copy the content and pate it in the root64.txt below the rootca content.
00tled
Make sure there is no space left in the txt between rootca and subb content.
Now change the root64.txt to root64.cer
909tled
Do the same steps to other PSC and also for the VC.
After successfully saving and exporting the root-64.cer file, it’s time to upload it to PSC\vCenter. Here I’ll use WinSCP again to copy the machine_ssl.cer and root-64.cer file.
32tled

Replace the existing certificate with the newly generated certificate

Login to the PSC.
Now that the files have been copied, open up the Certificate Manager Utility and select Option 1, Replace Machine SSL certificate with Custom Certificate. Provide the password to your administrator@vsphere.local account and select Option 2, “Import Custom Certificate(s) and key(s) to replace existing Machine SSL certificate” You will be prompted for following files:
machine_ssl.cermachine_ssl.key ,root-64.cer
232tled
Import Custom Certificates via Certificate Manager Utility
Select “Y” to continue the operation. This may take a few minutes, depending on how your systems are configured.
e2tled
e2tl2ed
Once the service status 100% completed then make sure to reboot the service on VC using “service-control –start –all” “ service-control -–stop –all”
After all the services are restarted then do the same steps to import the certificate using Certificate Manager Utility. 
90tl1ed
90tled
Verify the certificate by login to the we console of the VC https:\\FQDNVC:9443 .

Wednesday 18 November 2015

vSphere Storage Terminologies - VASA

VASA

vSphere Storage APIs - Storage Awareness (VASA) is one of a family of APIs used by third-party hardware, software, and storage providers to develop components that enable storage arrays to expose the array’s capabilities, configurations, health and events to the vCenter Server.

The following are the Storage APIs in this family:
  • Storage APIs - Multipathing, also known as the Pluggable Storage Architecture (PSA)
  • Storage APIs - Array Integration, formerly known as VAAI
  • Storage APIs - Storage Awareness
  • Storage APIs - Data Protection
  • Storage APIs - Site Recovery Manager
You will find Storage APIs - Storage Awareness referred to by other names, e.g.
  • vStorage APIs for Storage Awareness, VASA
  • vSphere APIs for Storage Awareness
It enables more advanced out-of-band communication between storage arrays and the virtualization layer.

Storage APIs - Storage Awareness (VASA). This is an example of a vCenter Server-based API. It enables storage arrays to inform the vCenter Server about the array’s capabilities, configurations, health and events.

Storage array capabilities are exported to the vSphere APIs using VASA.

What is VASA?
  • vSphere Storage API - Storage Awareness  (formerly vSphere API for Storage Awareness, commonly known as VASA)
  • Introduced with vSphere 5.
  • A set of standardized VMware APIs that allow storage vendors to push storage-related information into vCenter database
  • Enables VMware vCenter Server to detect the capabilities of the storage array LUNs and their datastores.
  • Improves the visibility of Physical Storage infrastructure through vSphere client
vSphere Storage APIs - Storage Awareness requirements:
  • vCenter Server 5.0 (or later)
  • ESX/ESXi hosts version 4.0 (or later)
  • Compliant storage arrays (that supports Storage API - Storage Awareness)
A Storage (or VASA) Provider is a software component that is offered either by vSphere or by a third party. Third-party storage providers are also known as vendor providers. The third-party storage provider is typically installed on the storage side and acts as a storage awareness service in the vSphere environment.

vSphere (or built-in) storage providers typically run on the ESXi hosts and do not require registration. For example, the storage provider that supports Virtual SAN becomes registered automatically when you enable Virtual SAN.

The Storage Provider exposes three classes of information to vCenter Server:
  • Storage Topology: Lists physical storage array elements’ information
  • Storage Capabilities: Storage capabilities and the services offered by the storage array
  • Storage State: Health status of the storage array, including alarms and events for configuration changes
"The VASA provider enables communication between the vSphere stack — ESXi hosts, vCenter server, and the vSphere Web Client — on one side, and the storage system on the other. The VASA provider runs on the storage side and integrates with vSphere Storage Monitoring Service (SMS) to manage all aspects of Virtual Volumes storage."

The Vendor Provider is a third-party storage provider.

The vendor provider is made available by the storage vendor and installed on the storage array or on a management device.

Use the vSphere Compatibility Guide to verify which Vendor (or VASA) Providers are supported by your chosen storage array. E.g. below is a list of HP vendor providers supported at up to ESXi 5.5 U2:

Vendor Provider Benefits
  • Storage System capability, configuration, status is made visible to vCenter Server. This enables an "end-to-end" view of your infrastructure from the vCenter Server.
  • Storage Capabilities information can be used in system-defined entries for Storage Profiles
The VASA provider is supplied by VMware or the storage vendor. Storage (or VASA) providers can run anywhere, except vCenter Server. Typically, the third-party storage provider runs on either the storage array service processor or on a standalone host.

VASA Provider or Storage Provider:  A storage‐side software component that acts as a web service interface (API) for the vSphere environment.  It can either run in the array or outside the array.

"The VASA 2.0 specification describes the use of virtual volumes to provide ease of access and ease of manageability to each VM datastore. Each VMware Virtual Machine Disk (VMDK) is provisioned as a separate VVol within the storage system. A single point of access on the fabric is provisioned via a protocol endpoint from the host to the storage."

"With VASA, capabilities such as RAID level, thin or thick provisioned, device type (SSD, Fast Class, or Nearline) and replication state can now be made visible from within vCenter Server’s disk management interface. This allows vSphere administrators to select the appropriate disk for virtual machine placement based on its needs."


VASA vs. VAAI
VASA and VAAI belong to a family of vSphere Storage APIs, use vendor providers to enhance several vSphere features and solutions. The two features work independently, and can coexist:

VASA (Storage APIs - Storage Awareness) collects configuration, capability and storage health information from storage arrays. One use-case is to build Storage Profiles based on array capabilities.
VAAI (Storage APIs - Array Integration) provides for hardware acceleration of certain storage operations, reducing CPU overhead on the host.