Replacing vCenter 6.0 SSL Certificate.
To generate the certificate we need to have Microsoft Certificate Authority server with the vSphere 6.0 Template for SSL Certificate.Pls check my other blog on creating the new template for vSphere 6.0.Generate the Certificate Signing Request
In vSphere 6.0 and later, the VMware Certificate Authority (VMCA) provisions your environment with certificates. This includes machine SSL certificates for secure connections, solution user certificates for authentication to vCenter Single Sign-On, and certificates for ESXi hosts that are added to vCenter Server.
In this blog we can see how to generate the Machine SSL Certificate .
Machine SSL Certificates
The machine SSL certificate for each node is used to create an SSL socket on the server side to which SSL clients connect. The certificate is used for server verification and for secure communication such as HTTPS or LDAPS.
All services communicate through the reverse proxy. For compatibility, services that were available in earlier versions of vSphere also use specific ports. For example, the vpxd service uses the MACHINE_SSL_CERT to expose its endpoint.
Every node (embedded deployment, management node, or Platform Services Controller), has its own machine SSL certificate. All services that are running on that node use this machine SSL certificate to expose their SSL endpoints.
The machine SSL certificate is used as follows:
| ■ | By the reverse proxy service on each Platform Services Controller node. SSL connections to individual vCenter services always go to the reverse proxy. Traffic does not go to the services themselves. |
| ■ | By the vCenter service (vpxd) on management nodes and embedded nodes. |
| ■ | By the VMware Directory Service (vmdir) on infrastructure nodes and embedded nodes. |
To generate the certificate we need Microsoft Certificate Authority server with the vSphere 6.0 Template for SSL Certificate.
First create the folder under root on both PSC and VC appliance – /root/cerssl .
Pls check the blog to transfer the file using the Winscp .
Generate the Certificate Signing Request
First we need to generate the CSR ( Certificate Signing Request ) for the Machine SSL which we get when we open the vSphere Web Client in a web browser.Run the below command to Generate the CSR in VCSA
/usr/lib/vmware-vmca/bin/certificate-manager
Run the utility and Select the Option 1
Provide the SSO Password


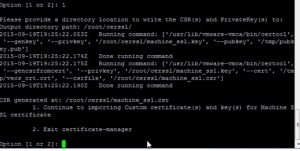
Once CSR is generated then exit by option 2.

Now login to the VC and do the same steps , only extra step is it will ask to provide the PSC IP address .
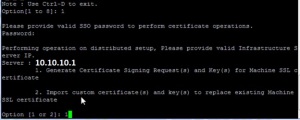
Once PSC IP is provided then generate the CSR by using the option 1

Exit the Certificate Manager by option 2.
Next step is to move the Machine CSR to the local machine by using the Winscp.

Next step is to login to the internal certificate issuing server.
On the browser type the https://localhost/certsrv/
Click on Request a Certificate.

Click advanced certificate request

Click the below option Submit a certificate by using the 64-encoded.
Open the CSR file which downloaded using Winscp and copy the clipboard.
Paste it on the below option Base-64-encoded certificate request.

Next Select the Certificate Template which we created before vSphere 6.0.

Next select the Base 64 encoded.
Click Download Certificate.

Rename the file to the appropriate node name.
Next Download the Download Certificate chain.
CERT.P7b
Open the Certificate chain and if we have the subordinate CA then we need to select both CA and Subordinate CA
First right click the Primary CA – All Tasks – Export.

Click Next
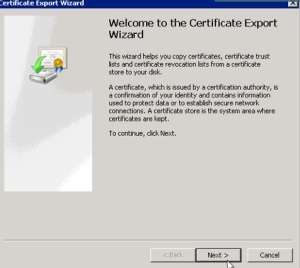
Click Base-64 encoded X.509 (.cer)


save the file as rootca.cer
Once done next again open the same chain file and select the subordinate CA .and export the same and save it as subca.cer.
Note:If we have only one CA then no need to do these steps.
Rename the rootca.cer and subca.cer to text file.
Create the new file called root64.txt.

Open the rootca.txt , Copy the content and pate it in the root64.txt.
Now open the subb.txt , Copy the content and pate it in the root64.txt below the rootca content.

Make sure there is no space left in the txt between rootca and subb content.
Now change the root64.txt to root64.cer

Do the same steps to other PSC and also for the VC.
After successfully saving and exporting the root-64.cer file, it’s time to upload it to PSC\vCenter. Here I’ll use WinSCP again to copy the machine_ssl.cer and root-64.cer file.
Replace the existing certificate with the newly generated certificate
Login to the PSC.Now that the files have been copied, open up the Certificate Manager Utility and select Option 1, Replace Machine SSL certificate with Custom Certificate. Provide the password to your administrator@vsphere.local account and select Option 2, “Import Custom Certificate(s) and key(s) to replace existing Machine SSL certificate” You will be prompted for following files:
machine_ssl.cer , machine_ssl.key ,root-64.cer
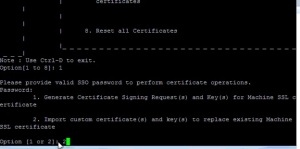
Import Custom Certificates via Certificate Manager Utility
Select “Y” to continue the operation. This may take a few minutes, depending on how your systems are configured.
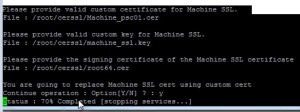

Once the service status 100% completed then make sure to reboot the service on VC using “service-control –start –all” “ service-control -–stop –all”
After all the services are restarted then do the same steps to import the certificate using Certificate Manager Utility.

Verify the certificate by login to the we console of the VC https:\\FQDNVC:9443 .
No comments:
Post a Comment